Precourse
This workshop is aimed towards biologists, researchers, computer scientists or data analysts planning to run, analyse and interpret an RNA-Seq experiment. Basic knowledge of working on the Unix/Linux command line and in R is expected.
Please follow the instructions below for installations prior to the workshop:
- Knowledge Requirements
- Slack
- Zoom
- Conda
Requirements
![]()
We strongly recommend for those not yet familiar with UNIX and/or R to take this opportunity and take these online tutorials, since those are requirements for the workshop. This will help you to develop your programming skills and we can always learn a few tricks here and there, even if you are already experienced.
- UNIX (part_1): http://swcarpentry.github.io/shell-novice/
- UNIX (part_2): https://carpentries-incubator.github.io/shell-extras/
- R (part_1): https://swcarpentry.github.io/r-novice-inflammation/
- R (part_2): http://swcarpentry.github.io/r-novice-gapminder/
After taking those courses (or any other equivalent course in programming in bash and R) will provide you with the basics in, for example:
- file structure and manipulation in bash and R
- loading, handling and manipulating vectors, matrices, factors and lists in R
- creating for-loops in R and bash
- using Rmarkdown for reports in R
- editing and writing files in the command line and in R
- and much more …
Slack
![]()
Make sure that you have Slack installed because we will use it a lot during the workshop. Communication, troubleshooting and group discussions will happen via Slack workspace NBIS-workshop-RNAseq. All accepted students will receive an invitation link via email. Please add this workspace to your Slack application on your desktop and do NOT use it in the web.
Please join the following channels once you are in the workspace:
#software-to-installfor questions about installation and troubleshooting#generalfor general questions about the workshop
Note: Please post your question in the channel and NOT directly to the teacher. Any participant that knows the answer to any problem is encouraged to help too.
Zoom
![]()
Make sure that you have the latest Zoom (version 5.4.0 or above) installed because we will use it a lot during the workshop for the lecture and groups discussions.
Previous Zoom versions will not work. If you already have Zoom installed, you can also update it by clicking in Check for Updates ... button in the main top menu.
Conda

During this workshop, you will use conda environments to run the exercises. This is because conda environments allow all users to have the same computing environment, i.e. package versions. This enforces reproducibility for you to run this material without the need to re-install or change your local versions. See and graphical example below:
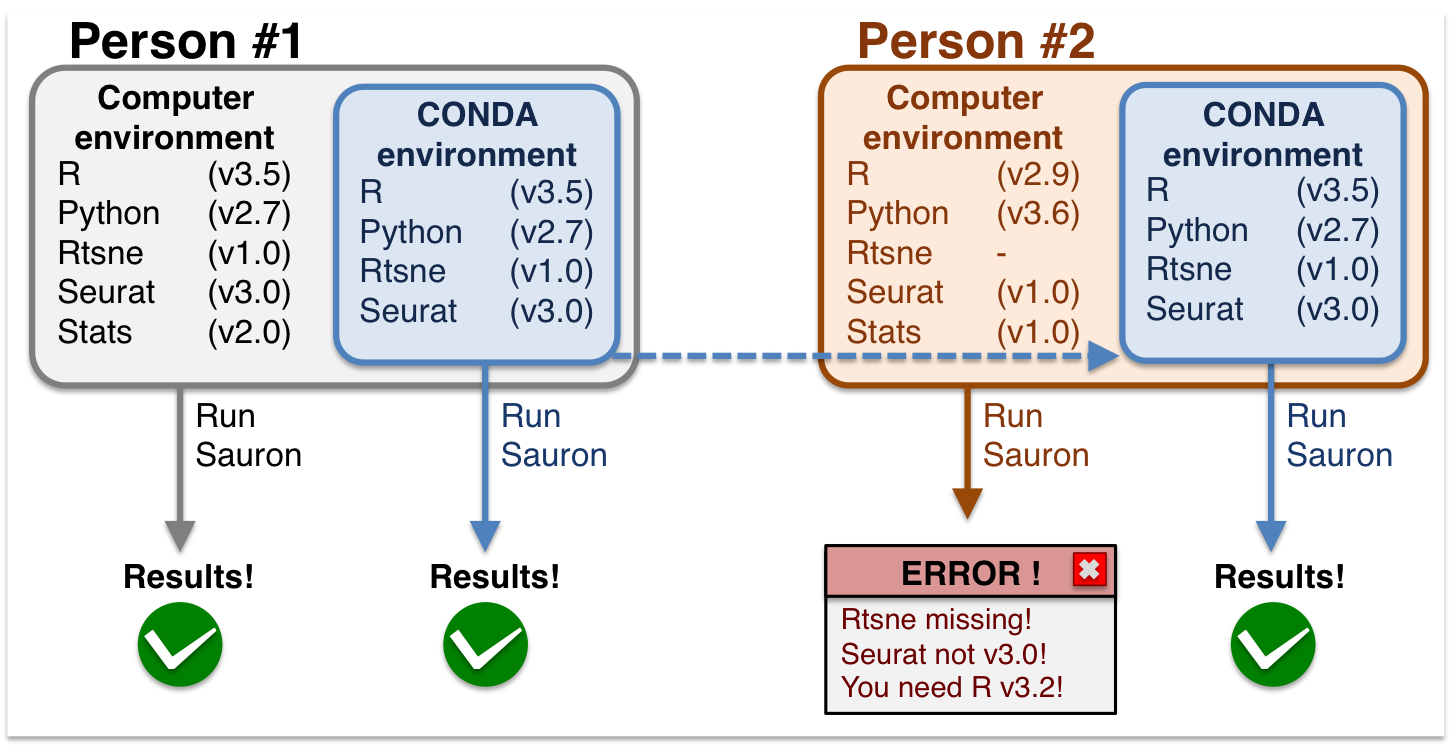
Conda environments are a self-contained directory that you can use in order to reproduce all your results.
Briefly, you need to:
- Install Conda
- Download the
.ymlenvironment file - Create and activate the environment
- Deactivate the environment after running your analyses
You can read more about Conda environments and other important concepts to help you make your research reproducible.
 Download and install Conda and Mamba
Start by installing Conda. We suggest installing Miniconda3 and NOT Anaconda. After installing Conda.
On Mac OS X
![]()
curl -o Miniconda3-latest-MacOSX-x86_64.sh https://repo.anaconda.com/miniconda/Miniconda3-latest-MacOSX-x86_64.sh
sh Miniconda3-latest-MacOSX-x86_64.sh
Follow the instructions on screen replying yes when necessary. Restart your terminal window to apply modifications. After restarting, you can type the command below to install Mamba:
conda init
conda install -n base -c conda-forge mamba
On Ubuntu
wget https://repo.anaconda.com/miniconda/Miniconda3-latest-Linux-x86_64.sh
sh Miniconda3-latest-Linux-x86_64.sh
Follow the instructions on screen replying yes when necessary. Restart your terminal window to apply modifications. After restarting, you can type the command below to install Mamba:
conda init
conda install -n base -c conda-forge mamba
On Windows 10
![]()
Unfortunately, not all packages available on conda are compatible with windows machines. The good news is that Windows 10 offers native linux support via the Windows Subsystem for Linux (WSL2). This allows you to run linux/bash commands from within windows without the need of a virtual machine nor a dual-boot setup (i.e. having 2 operating systems). However, WSL does not offer a complete support for graphical interfaces (such as RStudio in our case), so we need additional steps to make that happen.
On Windows 10, install the WSL if you don’t have it. Follow the instructions here: https://docs.microsoft.com/en-us/windows/wsl/install-win10
Once you have that installed, you can download and install MobaXterm (which is the enhanced terminal with graphical capacity): https://mobaxterm.mobatek.net
It is recommended that you INSTALL the program and not use the portable version.Inside MobaXterm, you will probably will see that your WSL is already listed on the left panel as an available connection. Just double-click it and you will be accessing it via MobaXterm. If by any chance you don’t see it there, close MobaXterm and go to the WSL terminal, because probably the WSL is not allowing SSH connections. You can follow this link for the instructions on how to do it. You need to complete until the step
Start or restart the SSH service, while the further steps are optional, but might be useful.Inside MobaXterm, download Conda with the command:
wget https://repo.anaconda.com/miniconda/Miniconda3-latest-Linux-x86_64.sh- Inside MobaXterm, type the commands below to install Conda. Follow the instructions for the installation there.
cd ~/Downloads
sh Miniconda3-latest-Linux-x86_64.sh- Inside MobaXterm, Follow the instructions on screen replying
yeswhen necessary. Restart your terminal window to apply modifications. After restarting, you can type the command below to install Mamba:
conda init
conda install -n base -c conda-forge mamba- Inside MobaXterm, type the commands below to install the X-server graphical packages that will be used to launch RStudio. https://docs.anaconda.com/anaconda/install/linux/
sudo apt-get update
sudo apt-get install libgl1-mesa-glx libegl1-mesa libxrandr2 libxrandr2 libxss1 libxcursor1 libxcomposite1 libasound2 libxi6 libxtst6- Close and open all application and Inside MobaXterm, you will probably will see that your WSL is already listed on the left panel as an available connection. Just double-click it and you will be accessing it via MobaXterm.
VirtualBox
![]()
If by any means you see that the installations are not working as it should on your computer, you can try to create a virtual machine to run UBUNTU and install everything there. But please keep this alternative as the last temporary resourse, as we recommend troubleshooting the installation o the up-mentioned methods.
Download and install on your machine VIRTUALBOX https://www.virtualbox.org
Download the ISO disk of UBUNTU https://ubuntu.com/download/desktop
On VIRTUALBOX, click on
Settings(yellow engine) >General>Advancedand make sure that both settings Shared Clipboard and Drag’n’Drop are set toBidirectional.Completely close VIRTUALBOX and start it again to apply changes.
On VIRTUALBOX, create a machine called Ubuntu and add the image above
- set the memory to the maximum allowed in the GREEN bar
- set the hard disk to be dynamic allocated
- all other things can be default
Proceed with the Ubuntu installation as recommended. You can set to do “Minimal Installation” and deactivate to get updates during installation.
Inside Ubuntu, open TERMINAL and type the commands below to install the X-server graphical packages that will be used to launch RStudio. https://docs.anaconda.com/anaconda/install/linux/
sudo apt-get update
sudo apt-get install libgl1-mesa-glx libegl1-mesa libxrandr2 libxrandr2 libxss1 libxcursor1 libxcomposite1 libasound2 libxi6 libxtst6- Inside UBUNTU, Download conda:
wget https://repo.anaconda.com/miniconda/Miniconda3-latest-Linux-x86_64.sh- Inside UBUNTU, open the TERMINAL and type the commands below. Follow the instructions for the installation there.
cd ~/Downloads
sh Miniconda3-latest-Linux-x86_64.sh- Close Terminal to apply the CONDA updates. Then you can create a course folder, download the environment file and create the environment:
mkdir ~/Desktop/course
cd ~/Desktop/course
wget https://raw.githubusercontent.com/NBISweden/workshop-RNAseq/master/environment_RNAseq2020.yml
conda env create -f environment_RNAseq2020.yml- You can then follow the instructions above to activate/deactivate the environment.
conda activate RNAseq2020
rstudio &
Create a conda environment from file
To download the environment_RNAseq2020.yml file using the command on Terminal:
#Ubuntu
wget https://raw.githubusercontent.com/NBISweden/workshop-RNAseq/master/environment_RNAseq2020.yml

#MacOSX
curl -o environment_RNAseq2020.yml https://raw.githubusercontent.com/NBISweden/workshop-RNAseq/master/environment_RNAseq2020.yml
After this, you should have a file named environment_RNAseq2020.yml in your directory (it does not matter where). Next, type:
mamba env create -f environment_RNAseq2020.ymlSeveral messages will show up on your screen and will tell you about the installation process. This may take a few minutes depending on how many packages are to be installed.
##Collecting package metadata: done
##Solving environment: done
##
##Downloading and Extracting Packages
##libcblas-3.8.0       | 6 KB      | ############################################################################# | 100%
##liblapack-3.8.0      | 6 KB      | ############################################################################# | 100%
##...
##Preparing transaction: done
##Verifying transaction: done
##Executing transaction: done
Activate the environment
Once the environment is created, we need to activate it in order to use the softwares and packages inside it. To activate an environment type:
conda activate RNAseq2020From this point on you can run any of the contents from the workshop. For instance, you can directly launch RStudio by typing rstudio. Here it is important to add the & symbol in the end to be able to use the command line at the same time if needed. You can open other files from Rstudio later as well.
rstudio PATH/my_script.Rmd & Deactivate the environment
After you’ve ran all your analyses, you can deactivate the environment by typing:
conda deactivateData

The data being used in this workshop is available here. However, we recommend you to download it using terminal, which simplify things a lot.
Go to your home folder and caunch the course environment:
cd ~/

conda activate RNAseq2020
Then you can simply run the wget command below to download the whole data for the course. This will take a long time since files are quite big.
wget -r -nH --cut-dirs=2 --no-parent --reject="index.html*" https://export.uppmax.uu.se/uppstore2017171/workshops/RNAseqAfter downloading, you will have a folder Do not rename nor place those folder elsewhere, since they will be used as is. You can now type:
ls ~/RNAseq/You now have 3 main folders there with data.
Code

The code from the course can be downloaded directly from Github.
But it is much easier to do it from the command line:
mkdir ~/RNAseq   #Run this line if you have not downloaded the data for the course yet
cd ~/RNAseq

for i in lab_annotation.Rmd lab_dge.Rmd lab_download.Rmd lab_eda.Rmd lab_functional.Rmd lab_preprocessing.Rmd lab_geoquery.Rmd
do
  curl -o $i https://raw.githubusercontent.com/NBISweden/workshop-RNAseq/master/$i
done