Overview
Teaching: 20 min
Exercises: 10 minQuestions
What is R?
What is RStudio and how does it work?
What is a good way to organise files in an analysis project?
How to create a README in markdown format?
Objectives
Be able to explain what R and RStudio are, what they are used for, and how they relate to each other.
Describe the purpose of the RStudio Script, Console, Environment, and Plots panes.
Organize files and directories for a set of analyses as an R Project, and understand the purpose of the working directory.
What is R?
The term “R” is used to refer to both the programming language and the
software that interprets the scripts written using it.
-
R is a powerful programming language used for statistical computing and graphics, popular among data analysts, statisticians, and researchers.
-
R has a large and active community of users and developers, which provides extensive support, documentation, and packages for various tasks, such as data manipulation, machine learning, and data visualization.
-
R is an open-source language, which means it is free to use, modify, and distribute, making it accessible to a wide range of users.
-
R has a rich ecosystem of packages that extend its functionality, allowing users to tailor their analyses to specific domains or tasks, and making it a flexible and customizable scripting language for data analysis and visualization.
What is RStudio?
RStudio is currently a very popular way to not only write your R scripts but also to interact with the R software. To function correctly, RStudio needs R and therefore both need to be installed on your computer.
Discussion: Your experience and expectations
- What has motivated you to learn R? Have you had a research question for which spreadsheet programs such as Excel have proven difficult to use, or where the size of the data set created issues?
- In what situations do you imagine that using R will be most valuable to you? {: .discussion}
Knowing your way around RStudio
Let’s start by learning about RStudio, which is an Integrated Development Environment (IDE) for working with R.
The RStudio IDE open-source product is free under the Affero General Public License (AGPL) v3. The RStudio IDE is also available with a commercial license and priority email support from RStudio, PBC.
We can use RStudio IDE to write code, navigate the files on our computer, inspect the variables we are going to create, and visualize the plots we will generate. RStudio can also be used for other things (e.g., version control, developing packages, writing Shiny apps). Version control will be introduced later on, but packages and Shiny apps will not be covered during this workshop.
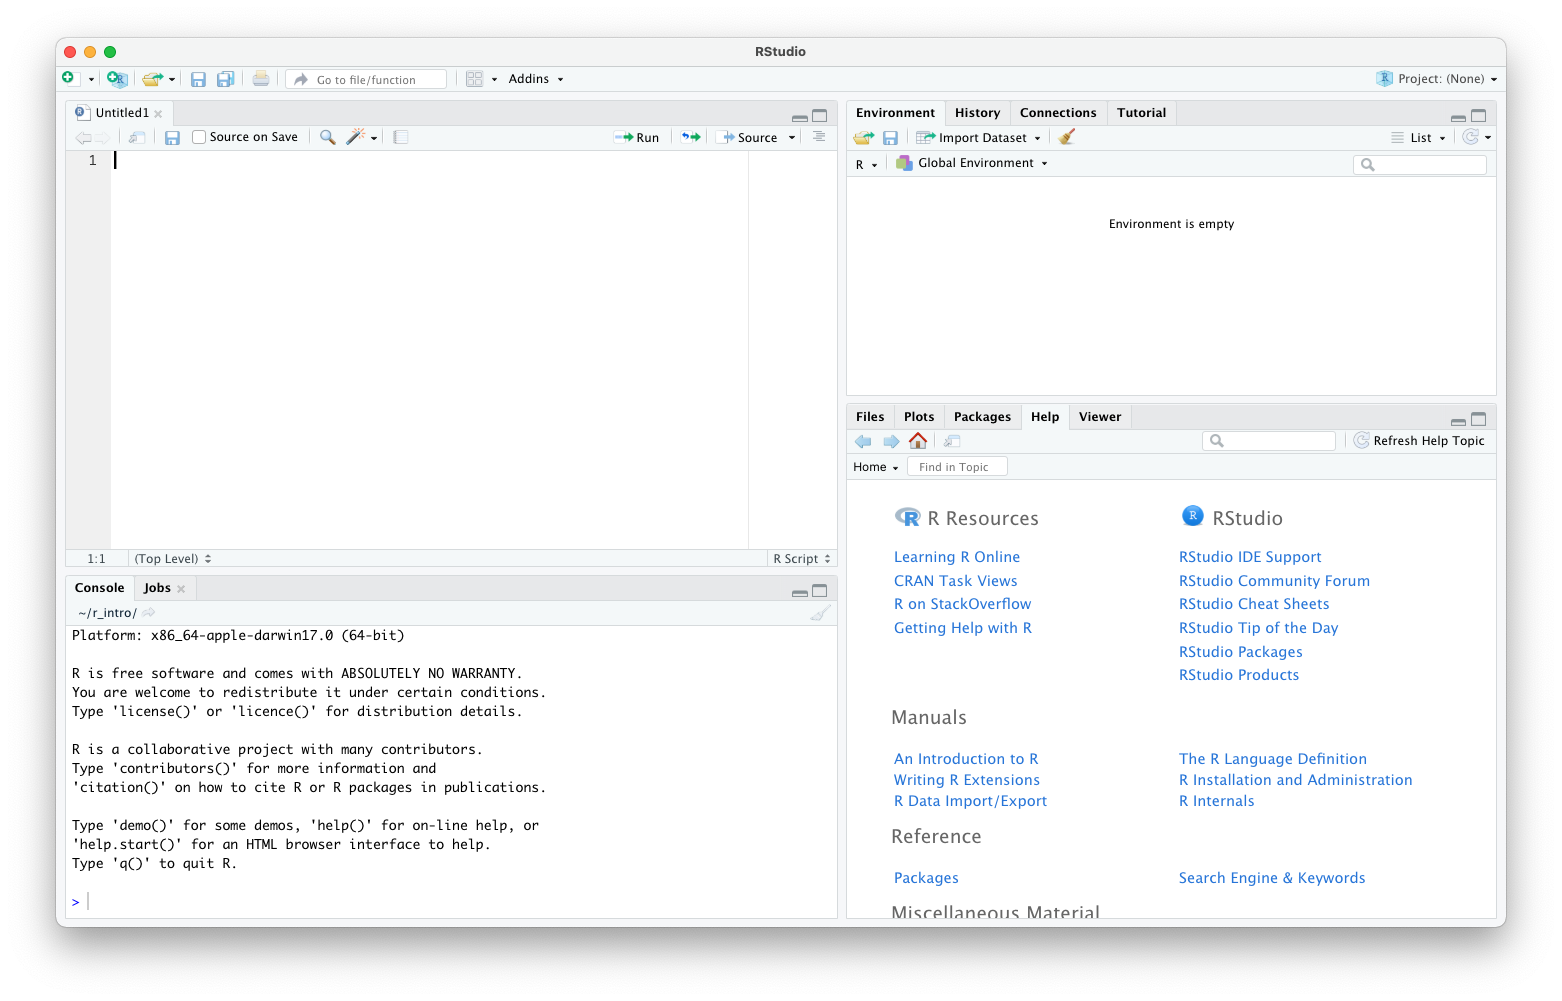
RStudio is divided into 4 “Panes”:
-
Source Editor Pane: The Source Editor Pane (top-left, in the default layout) is where you write and edit your R code. It provides a variety of features to help you write code efficiently, including syntax highlighting, code completion, and automatic indentation. Syntax highlighting makes it easier to identify different elements of your code, such as keywords, functions, and variables, by using different colors. Code completion suggests possible completions as you type, helping you write code more quickly and accurately. Automatic indentation helps maintain consistent code formatting by automatically adjusting the indentation level as you type.
-
Environment and History Pane: The Environment and History Pane (top-right) provides information about the current state of your R environment. It displays a list of variables, functions, and data objects that are currently available in your R session, along with their values and attributes. You can also use this pane to create, modify, and delete variables and objects in your R environment. Additionally, the Environment and History Pane allows you to view and manage your command history, which is a record of previously executed commands. You can search, filter, and recall commands from your command history, making it convenient for revisiting and reusing past code.
-
Plots and Help Pane: The Plots and Help Pane (bottom-right) serves two main purposes. Firstly, it displays plots and visualizations generated by R code, making it easy to visualize data and analyse results. Plots can be interactive and resizable, allowing you to explore and customize visualizations to suit your needs. Secondly, the Plots and Help Pane provides access to R documentation and help files. You can search for help on R functions, packages, and other resources directly from RStudio. The Help Pane also displays the documentation for the currently selected R object in your environment, making it convenient for quickly referencing documentation while coding.
-
Console Pane: The Console Pane (bottom-left) is where you interact with the R programming language. You can enter R commands directly into the console, execute them by pressing Enter, and view the results. The console displays the output of executed commands, such as printed results, error messages, and warnings. You can also use the console to interact with the R environment, including assigning values to variables, loading data, and installing and loading packages. The console also supports command history, allowing you to scroll through and recall previously executed commands.
The placement of these panes and their content can be customized (see menu, Tools -> Global Options -> Pane Layout).
One of the advantages of using RStudio is that all the information you need to write code is available in a single window. Additionally, with many shortcuts, autocompletion, and highlighting for the major file types you use while developing in R, RStudio will make typing easier and less error-prone.
Create an RStudio project
It is good practice to keep a set of related data, analyses, and text self-contained in a single folder, called the working directory. All of the scripts within this folder can then use relative paths to files that indicate where inside the project a file is located (as opposed to absolute paths, which point to where a file is on a specific computer). Working this way makes it a lot easier to move your project around on your computer and share it with others without worrying about whether or not the underlying scripts will still work.
RStudio provides a helpful set of tools to do this through its “Projects” interface, which not only creates a working directory for you, but also remembers its location (allowing you to quickly navigate to it) and optionally preserves custom settings and open files to make it easier to resume work after a break. Go through the steps for creating an “R Project” for this tutorial below.
- Start RStudio.
- Under the
Filemenu, click onNew Project. ChooseNew Directory, thenNew Project. - Enter a name for this new folder (or “directory”), and choose a
convenient location for it. This will be your working directory
(e.g.,
~/r_intro). - Click on
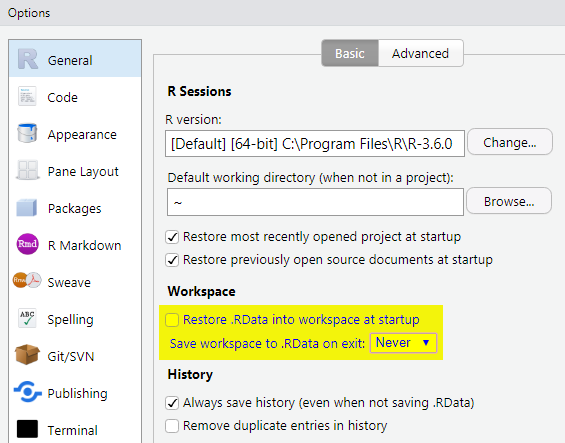
Create Project. - (Optional) Set Preferences to “Never” save workspace in RStudio.
A workspace is your current working environment in R which includes any
user-defined object. By default, all of these objects will be saved, and
automatically loaded, when you reopen your project. Saving a workspace
to .RData can be cumbersome, especially if you are working with larger
datasets, and it can lead to hard to debug errors by having objects in
memory you forgot you had. To turn that off, go to Tools –> “Global
Options” and select the “Never” option for “Save workspace to .RData” on
exit.
Organizing your working directory
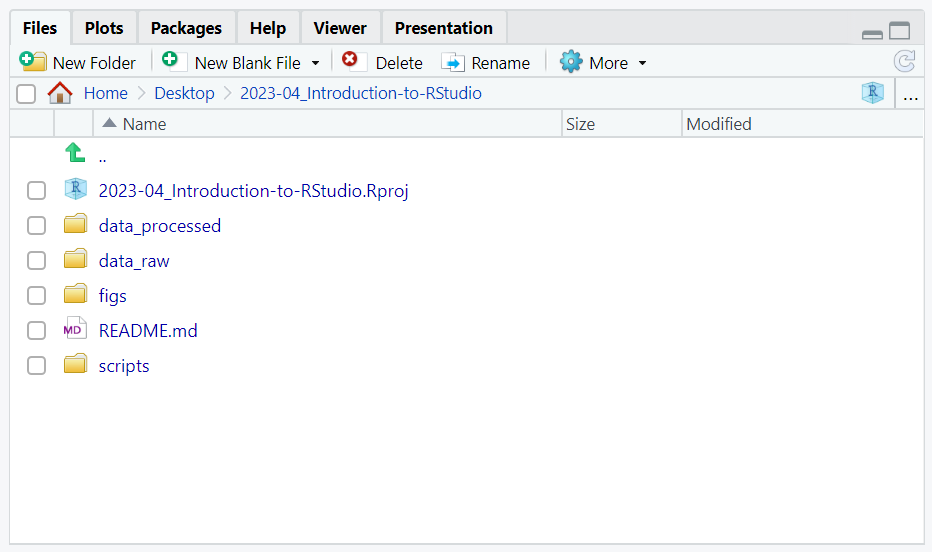
Using a consistent folder structure across your projects will help keep things organized, and will also make it easy to find/file things in the future. This can be especially helpful when you have multiple projects. In general, you may create directories (folders) for scripts, data_raw, data_processed, and figs.
data_raw&data_processedUse these folders to store raw data and intermediate datasets you may create for the need of a particular analysis. For the sake of transparency and provenance, you should always keep a copy of your raw data accessible and do as much of your data cleanup and preprocessing programmatically (i.e., with scripts, rather than manually) as possible. Separating raw data from processed data is also a good idea.figs/This would be the place to keep plots and figures generated from the code.scripts/This would be the location to keep your R scripts for different analyses or plotting, and potentially a separate folder for your functions (more on that later).- Additional (sub)directories depending on your project needs.
Creating a README file
It is good practice to create a README text file at the top level of your working directory to provide the context of the files in the directory. Making this a habit can save you many hours of work, as it will allow you to quickly get into a project again after being away from it for some time. You may also find a README file helpful when you collaborate with others around a bunch of files.
- Under the
Filemenu, first click onNew File, and then selectMarkdown File. - Enter the text “## Course material for learning RStudio and R” into the new file.
- Save the file to your working directory and call it simply
README.
Writing the README file in Markdown
While READMEs can be written in any text file format, it is nowadays very common to use the Markdown language (the files are then usually named “README.md”). Markdown is a lightweight markup language that makes it relatively easy to add text formatting using a plain-text editor. {: .callout}
Your working directory should now look like this:
The working directory
The working directory is an important concept to understand. It is the place from where R will be looking for and saving the files. When you write code for your project, it should refer to files in relation to the root of your working directory and only need files within this structure.
Using RStudio projects makes this easy and ensures that your working
directory is set properly. If you need to check it, n you cause
getwd(). If for some reason your working directory is not what it
should be, you can change it in the RStudio interface by navigating in
the file browser where your working directory should be, and clicking on
the blue gear icon “More”, and select “Set As Working Directory”.
Alternatively you can use setwd("/path/to/working/directory") to reset
your working directory. However, your scripts should not include this
line because it will fail on someone else’s computer.
Seeking help
Searching function documentation with ? and ??
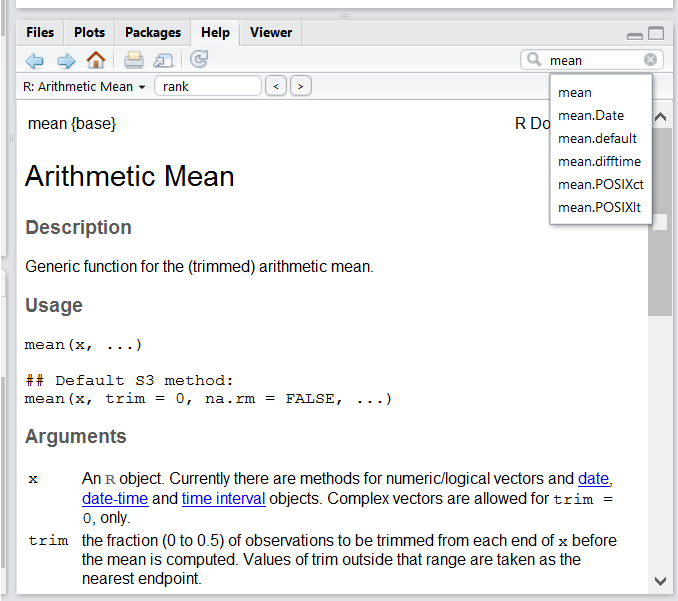
If you need help with a specific function, let’s say mean(), you can
type ?mean or press F1 while your cursor is on the function
name. If you are looking for a function to do a particular task, but
don’t know the function name, you can use the double question mark ??,
for example ??kruskall. Both commands will open matching help files in
RStudio’s help panel in the lower right corner. You can also use the
help panel to search help directly, as seen in the screenshot.
Automatic code completion
When you write code in RStudio, you can use its automatic code completion to remind yourself of a function’s name or arguments. Start typing the function name and pay attention to the suggestions that pop up. Use the up and down arrow to select a suggested code completion and Tab to apply it. You can also use code completion to complete function’s argument names, object, names and file names. It even works if you don’t get the spelling 100% correct.
Package vignettes and cheat sheets
In addition to the documentation for individual functions, many packages
have vignettes – instructions for how to use the package to do
certain tasks. Vignettes are great for learning by example. Vignettes
are accessible via the package help and by using the function
browseVignettes().
There is also a Help menu at the top of the RStudio window, that has cheat sheets for popular packages, RStudio keyboard shortcuts, and more.
Finding more functions and packages
RStudio’s help only searches the packages that you have installed on your machine, but there are many more available on CRAN and GitHub. To search across all available R packages, you can use the website rdocumentation.org. Often, a generic Google or internet search “R <task>” will send you to the appropriate package documentation or a forum where someone else has already asked your question. Many packages also have websites with additional help, tutorials, news and more (for example tidyverse.org).
Dealing with error messages
Don’t get discouraged if your code doesn’t run immediately! Error messages are common when programming, and fixing errors is part of any programmers daily work. Often, the problem is a small typo in a variable name or a missing parenthesis. Watch for the red x’s next to your code in Rstudio. These may provide helpful hints about the source of the problem.
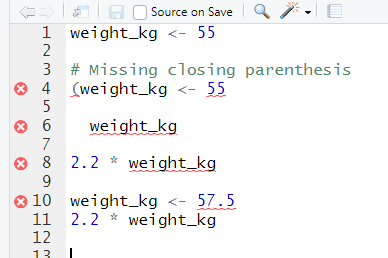
If you can’t fix an error yourself, start by googling it. Some error messages are too generic to diagnose a problem (e.g. “subscript out of bounds”). In that case it might help to include the name of the function or package you’re using in your query.
Asking for help
If your Google search is unsuccessful, you may want to ask other R users for help. There are different places where you can ask for help. During this workshop, don’t hesitate to talk to your neighbor, compare your answers, and ask for help. You might also be interested in organizing regular meetings following the workshop to keep learning from each other. If you have a friend or colleague with more experience than you, they might also be able and willing to help you.
Besides that, there are a few places on the internet that provide help:
- Stack Overflow: Many questions have already been answered, but the challenge is to use the right words in your search to find them. If your question hasn’t been answered before and is well crafted, chances are you will get an answer in less than 5 min. Remember to follow their guidelines on how to ask a good question.
- The R-help mailing list: it is used by a lot of people (including most of the R core team). If your question is valid (read its Posting Guide), you are likely to get an answer very fast, but the tone can be pretty dry and it is not always very welcoming to new users.
- If your question is about a specific package rather than a base R
function, see if there is a mailing list for the package. Usually
it’s included in the DESCRIPTION file of the package that can be
accessed using
packageDescription("<package-name>"). - You can also try to contact the package author directly, by emailing them or opening an issue on the code repository (e.g., on GitHub).
- There are also some topic-specific mailing lists (GIS, phylogenetics, etc…), the complete list is here.
Summary
In this tutorial, we provided a brief overview of the programming language R and demonstrated how to navigate in RStudio. In the next section, we will delve deeper into our newfound knowledge by continuing with practical examples of R programming. Specifically, we will further develop our R Project by incorporating real data into our folders, thereby enriching our learning experience in RStudio.
Next up is the introduction to scripted analysis with R. {: .callout}
