Running a scRNAseq pipeline
In this tutorial you will run mapping, some qc-steps and gene expression estimation for scRNAseq data. We have set up a small example with 12 human embryonic cells from the study Petropoulos et al. (Cell 2016) link. These cells are SmartSeq2 libraries.
The pipeline
NBIS has a Snakemake pipeline for mapping and processing single cell RNA seq data, especially tailored for SmartSeq2 data. More documentation on our pipeline can be found at the pipeline repository: lts-workflows-sm-scrnaseq
Snakemake
We have implemented a Snakemake pipline, but any type of pipeline language could perform these tasks. If you want to learn more about Snakemake, which is a python based pipeline language, please check their documentation or run their tutorial.
Conda environments
We have used Conda package management for all package installations, this is a good system for installing packages with all its dependencies. For more information on Conda, please have a look at their website.
We have prepared all installations already, but below is a short summary of the steps required to set up the pipeline. Read through the details, but is suggested that you create your own folder and run mapping for a few samples from the step - 5. Create your own project folder. If you also want to try out the installations, you are free to do so.
1. Conda installation and creating an environment - OBS! no need to run.
This has already been prepared for this course, but in case you want to run it yourself, you should follow these steps but changing paths etc.
First, you need to install miniconda following instructions at: http://conda.pydata.org/docs/install/quick.html for your system.
At Uppmax:
cd /proj/uppstore2017171/courses/scrnaseq_course/
   	wget https://repo.continuum.io/miniconda/Miniconda3-latest-Linux-x86_64.sh
   	bash Miniconda3-latest-Linux-x86_64.sh
   	# reply "yes" to licence agreement, and specify location for installation
   	# in this case, installed at: /proj/uppstore2017171/courses/scrnaseq_course/miniconda3
# reply yes/no if you want the location of the conda bin to be added to your bashrc.
Since the miniconda installation is now at /proj/uppstore2017171/courses/scrnaseq_course/miniconda3/bin you will have to add that to your path. Either through your .bashrc or on the commandline.
export PATH=/proj/uppstore2017171/courses/scrnaseq_course/miniconda3/bin:$PATH
Next step is to create a conda environment. The conda package for the pipeline is named lts-workflows-sm-scrnaseq and we want to install version 0.3.3. To install it we need to add the channel scilifelab-lts, but also 2 other channels bioconda and conda-forge since some of the dependency packages will be downloaded from those channels.
We define a name for the environment, in this case scrnaseq_course with the -n flag. We also need another environment for some python2 packages that are needed in the pipeline. Since the main pipeline is using python3 these cannot be installed under the same environment.
The commands that were used are:
 export PATH=/proj/uppstore2017171/courses/scrnaseq_course/miniconda3/bin:$PATH
 # create the main environment
 conda create -n scrnaseq_course -y -c scilifelab-lts -c bioconda -c conda-forge lts-workflows-sm-scrnaseq=0.3.3
 # create one environment for the python2 packages.
 conda create -n py2.7 -y -c bioconda python=2.7 rpkmforgenes=1.0.1 rseqc=2.6.4
Now we have an environment with all the packages we need for running the pipeline. So to get access to all the programs, we need to activate the environment:
source activate scrnaseq_course
Now the name of the activated conda should appear in your terminal like:
(scrnaseq_course) [username@rackham1 foldername]$
You should now be able to run all the programs like python, R, samtools, STAR etc using all programs installed under that conda environment.
2. Download reference files - OBS! no need to run.
To run the snakemake pipeline, you need a number of files:
- Genome file + ERCC spike-ins (+ any marker genes that you want to include, e.g. GFP, dsRed etc)
- Annotation file + annotations for spike-ins + extra constructs
- A bed-file with known genes for RseQC geneBodyCoverage.
In this example we will map data from a human embryonic study, so we need to get genome and annotation files for the human genome, here we use ensembl annotations/genome:
 cd /proj/uppstore2017171/courses/scrnaseq_course/pipeline/ref/
 wget ftp://ftp.ensembl.org/pub/release-90/fasta/homo_sapiens/dna/Homo_sapiens.GRCh38.dna.primary_assembly.fa.gz
 wget ftp://ftp.ensembl.org/pub/release-90/gtf/homo_sapiens/Homo_sapiens.GRCh38.90.gtf.gz
 cp /proj/uppstore2017171/staff/asab/data/genomes/ERCC/ERCC_spikes_no_polyA.fa ERCC.fasta
 # unzip the files
 gunzip Homo_sapiens.GRCh38.dna.primary_assembly.fa.gz
 gunzip Homo_sapiens.GRCh38.dna.primary_assembly.fa.gz
OBS! If you download the ERCC from any other source, please make sure that you remove the polyA tails that are added to the file since they will give rise to spurios mapping of reads with long stretches of Ts.
You can also add in additional sequence files with marker genes, like EGFP, dsRed or similar that you want to include mapping for.
For rseqc we also need a more conservtive annotation file with only house-keeping genes. With the full gene file this steps is very time consuming, so it is better to run on a smaller well defined gene set. The file was manually downloaded from Rseqc website that has files for some model species.
3. Files needed to run the pipeline
The metadata file
The metadata file is a comma separated file with all possible information about the samples. The first column has to be sample name, with header SM. Some columns have to specify the folder names for where the files are located.
OBS! in the configuration file, you will have to define what the layout of the folders are, so make sure that the headers of the meta data file has the same names as they are defined in the sections samplefmt and runfmt in the configuration file.
We have a file prepared for the example with 12 samples, have a look at the file:
less /proj/uppstore2017171/courses/scrnaseq_course/pipeline_data/files/Meta_data_human_embryo.csv
The Snakefile
The snakefile is the main workflow file that snakemake runs on. If there is a file named Snakefile in the folder you are standing in when you execute the command snakemake it will automatically detect the snakefile. But you can also use any name you want for the file, but then you would have to specify what file to run on with the flag --snakefile.
In the snakefile you can write your snakemake rules directly, or load them from other sources, which we do in this example. So you will not need to change anything in the snakefile except the working diretory.
The configuration file
Snakemake configuration files can be in YAML format or JSON format. In this example we will use YAML format, for more information on YAML, please have a look at: https://learnxinyminutes.com/docs/yaml/.
OBS! Keep in mind that tabs in the wrong places of a YAML file can easily create errors, so use spaces for indented blocks instead of tabs.
In the configuration file you will have to specify the paths to your files, what files to include and you can also change the settings on what to run, on which samples to run it on, and how to set different parameters for all the programs that are used. In our example configuration file we have made comments on which of the parameters you may need to modify to run on your own data:
/proj/uppstore2017171/courses/scrnaseq_course/pipeline_data/files/config.yaml
You need to define the format for input data (often you may have nested folders for the fastq files, and sometimes multiple fastq files for one sample) under the section runformat. And the format you want to use to use for the output data under samplefmt. In our case we have the same for both:
   samplefmt: data/samples/{SM}/{SM}
   runfmt: data/samples/{SM}/{SM}
Which corresponds to the folder structure that we have:
data/samples/ERR1042421/ERR1042421.fastq.gz
4. Rulegraph - summary of the pipeline
We can visualize all the rule dependencies in snakemake with a DAG using the --rulegraph option. We ran the command:
snakemake make_qc_report --rulegraph -npF | dot -Tpng > rulegraph.png
Which created this plot:
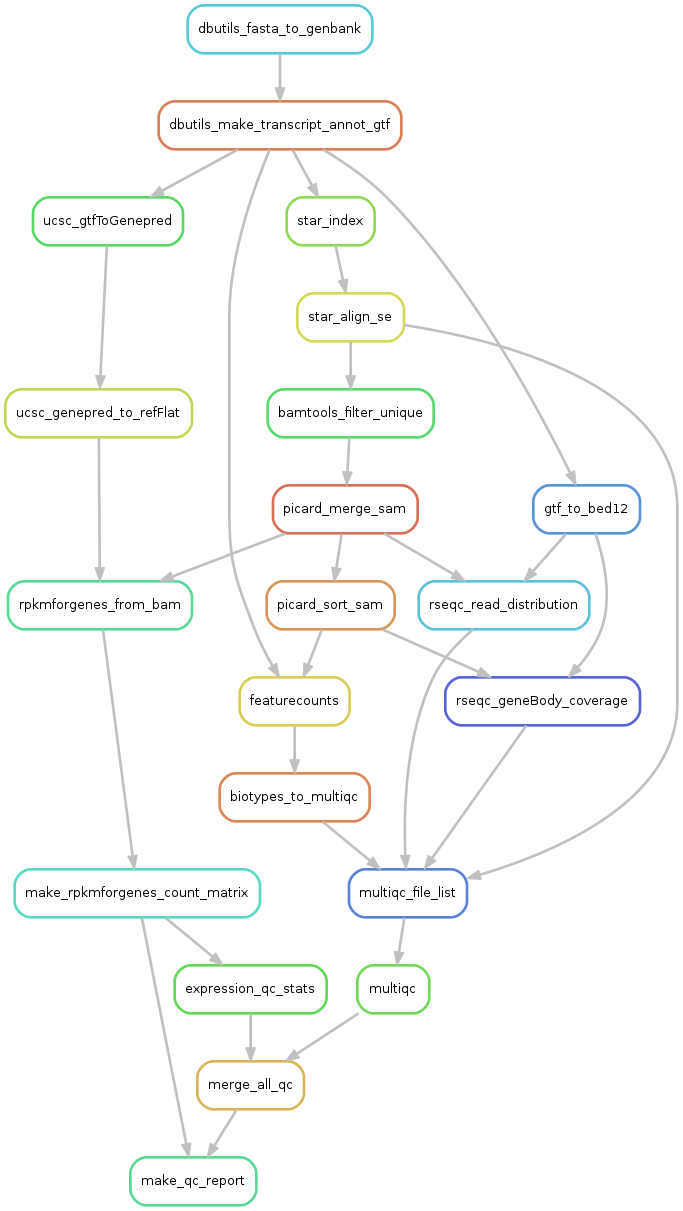
Here you can see all the steps that the pipeline wants to perform, and how they depend on eachother. Each arrow represents files that one rule creates and another rule has as input.
What will be done is:
- dbutils_fasta_to_genbank - creates a genbank file for ERCC or other extra seqs
- dbutils_make_transcript_annot_gtf - makes a joint gtf file for all sequences
- ucsc_gtfToGenepred - converts gtf to genepred
- ucsc_genepred_to_refFlat - converts genepred to refFlat - annotation file needed for rpkmforgenes
- rpkmforgenes_from_bam - runs rpkmforgenes to get gene expression
- make_rpkmforgenes_count_matrix - takes all individual rpkmforgenes outputs and creates one matrix with counts and one with rpkms.
- expression_qc_stats - calculates some stats like detected genes/spike-ins, cell-to-cell correlations etc.
- star_index - takes genome fasta and annotation gtf files and makes a STAR index
- star_align_se - alings fastq files to the star_index
- bamtools filter unique - extracts only uniquely mapping reads from bamfile.
- picard_merge - will merge if multiple bamfiles per sample
- picard_sort_sam - will sort the bamfile
- rseqc_geneBody_coverage - RseQC function that looks at where in the genes the reads map.
- multiqc_file_list - makes a list of all input files to multiqc.
- multiqc - summarizes qc-stats for all rseqc steps and STAR alignment log
- merge_all_qc - makes one large table with all qc-stats
- make_qc_report - will create a suggested filtering and plot a bunch of QC-stats.
5. Create your own project folder
First, go into one of your own folders and create one pipeline folder. Move into that folder and instead of copying all the large files that you need you will instead make symlinks with the command cp -rs that will create all the nested folders, but creates symlinks to the fastq files. We will also make a symlink to the reference folder with ln -s so that we do not have to make a copy and create indexes for the human genome.
   mkdir data
   # create a folder with the samples and symlinks to fastq files:
   cp -rs /proj/uppstore2017171/courses/scrnaseq_course/pipeline_data/subsampled data/samples
   # make symlink to the reference folder:
   ln -s /proj/uppstore2017171/courses/scrnaseq_course/pipeline/data/ref data/ref
   # copy the configuraiton file
   cp /proj/uppstore2017171/courses/scrnaseq_course/pipeline_data/files/config.yaml .
   # copy the Snakemake file
   cp /proj/uppstore2017171/courses/scrnaseq_course/pipeline_data/files/Snakefile .
OBS! Modify the working directory path in your Snakefile to the directory where you have copied all the data. Also, have a look in the configuration file, to check what settings you are using and change the email adress.
6. Run the pipeline
For running different steps of the pipeline there are a number of target rules that specifies which main steps of the pipeline that should be run:
align- will run STAR mappingrseqc- will run the steps of the RseQC package that is specified in the configuration file.rpkmforgenes- will run rpkmforgenes to estimate gene expressionall- will run all steps abovemake_qc_report- will also prepare summary files and make qc summary - with this target rule everything in the pipeline should run.
With snakemake, it is a good idea to start with a dryrun (using flag -n) to check that everything looks okay. Run also with flag -p to print out all the commands that snakemake wants to execute.
You also have to specify the number of cores to run on (in this case we will set it to 4) with the -j flag.
Make sure that you have the conda environment scrnaseq_course activated. If you already have it active, no need to rerun. Let’s test first with the align rule.
  export PATH=/proj/uppstore2017171/courses/scrnaseq_course/miniconda3/bin:$PATH
  source activate scrnaseq_course
  snakemake align -j 4 -np
You should now see a list of all rules that the pipeline needs to run, and also all of the commands. It will also give a summary of the number of all rule counts.
Do the same but for everything including qc-report:
snakemake make_qc_report -j 4 -np
If all looks fine at this point, it is time to start running the pipeline. So all you have to do is to remove the -n flag and run again.
But since this will take quite a while to run, we suggest that you instead run the pipeline with an sbatch script.
If you want to run instead as an sbatch job and submit it to the SLURM queue, there is an example sbatch script:
/proj/uppstore2017171/courses/scrnaseq_course/pipeline_data/files/run_all_pipeline.sbatch
Copy that file to your folder and change all paths for reports and working directory to your folder, and also create one folder for output of the sbatch reports and fix paths to that folder in the sbatch script. Also, do not forget to change the email adress where you will recieve Slurm notificiations. Then submit the job with:
sbatch run_all_pipeline.sbatch
Now you can check the queue and see if your job has started yet with:
jobinfo -u username
Take a look at the report files that you specified in your sbatch script. Any error message from the pipeline will be appear there, and you can also follow the progress of the pipeline. We expect that the pipeline should take about 1.5h to run, so you can proceed with other tutorials while it runs.
7. Output files
If all went well, you should now have copleted all the steps. Within the folder data/samples/ you should now have a number of files for each sample.
Have look in one of the sample folders and see if you can figure out what all the files are.
You should also have a number of summary files in the folder results/.
- merge.rpkmforgenes_genes.txt - a list of genes and what transcripts are included per gene
- merge.rpkmforgenes_rpkm.txt - rpkms
- merge.rpkmforgenes_counts.txt - counts
- merge.rpkmforgenes_rpkm.qc_stats.txt - qc-stats from rpkms
- qc_summary.csv - all qc stats from multiqc, rpkm stats etc.
- qc_report.html - the qc report
- qc_report.filtered_cells.txt - a file with suggested cells to filter out
- qc_report.settings.yaml - a yaml file with the settings that were used for qc-filtering.
- qc_report.sceset.RData - a SingleCellExperiment class object in Rdata format
Also folder multiqc with the multiqc html report plus all the files that were stored during the multiqc run.
Download the files qc_report.html and multiqc_report.html to your computer and have a look at them in your browser.
If you are happy with the filtering of cells, you can simply use the file that the qc-summary creates. You can also modify the filtering settings by making changes to the file qc-section in config.yaml and rerun the step for creating qc-report with -f (force) flag.
In this small example, we only have 12 cells, so it does not make much sense do do filtering in this manner. You can instead have a look at a full summary from this project with 834 cells here