RaukR lab demo
RaukR 2022 • Advanced R for Bioinformatics
Roy Francis
![]()
This is a demo rmarkdown lab document to showcase the RaukR 2021 lab theme, style and usage.
1 RMarkdown
- This is an RMarkdown document.
- Markdown is a simple formatting syntax for authoring HTML, PDF, and MS Word documents.
- Refer here for a guide.
- In RStudio, you create a
.Rmdtext file, then click the Knit button. .Rmddocuments can also be rendered as such:
rmarkdown::render("report.Rmd",output_format="html_document")2 Layout
Use <div>content</div> for block content and <span>content</span> for inline content.
For paragraphs, use <p>content</p>. And use classes text-left, text-center and text-right to align text left, center and right respectively.
<p class="text-right" style="background-color: aliceblue">This content is aligned right.</p>
<p class="text-center" style="background-color: aliceblue">This content is aligned center.</p>
This content is aligned right.
This content is aligned center.
Content can be organised into columns using pull-left-XX or pull-right-XX. Classes for 30, 40, 50, 60 and 70 have been implemented for left and right. Note that the total width must sum to 100.
<div class="pull-left-50" style="background-color: aliceblue">This content is pulled left.</div>
<div class="pull-right-50 text-center" style="background-color: aliceblue">This content is pulled right and text centered.</div><div class="pull-left-30" style="background-color: aliceblue">This content is pulled left.</div>
<div class="pull-right-70" style="background-color: aliceblue">This content is pulled right.</div>This is an example of nested columns.
<div class="pull-left-30" style="background-color: aliceblue">This column is pulled left.</div>
<div class="pull-right-70" style="background-color: aliceblue">
This column is pulled right.
<div class="pull-left-50" style="background-color: #d0ece7">
Nested left.
</div>
<div class="pull-right-50" style="background-color: #f2d7d5">
Nested right.
</div>
</div>Nested left.
Nested right.
3 Text formatting
Headings can be defined as shown below.
## Level 2 heading
### Level 3 heading
#### Level 4 heading
##### Level 5 heading
###### Level 6 heading
3.1 Level 2 heading
3.1.1 Level 3 heading
3.1.1.1 Level 4 heading
3.1.1.1.1 Level 5 heading
3.1.1.1.1.1 Level 6 heading
Six custom classes are defined for text scaling. This can be defined inside a paragraph (<p>) or <span>.
<span class="largest">Largest text.</span>
<span class="larger">Larger text.</span>
<span class="large">Large text.</span>
Normal text.
<span class="small">Small text.</span>
<span class="smaller">Smaller text.</span>
<span class="smallest">Smallest text.</span>
Largest text.
Larger text.
Large text.
Normal text.
Small text.
Smaller text.
Smallest text.
A horizontal line can be created using three or more * or -.
***
This is __Bold text__ This is Bold text
This is _Italic text_ This is Italic text
~~Strikethrough~~ text Strikethrough text
This is Subscript H~2~O displayed as H2O
This is Superscript 2^10^ displayed as 210
This is a [link](r-project.org) This is a link
An example of footnote reference 1
> This is a block quote. This
> paragraph has two lines.
>
> 1. This is a list inside a block quote.
> 2. Second item.
This is a block quote. This paragraph has two lines.
- This is a list inside a block quote.
- Second item.
Icons from FontAwesome can be displayed using the HTML <i> tag. Note that not all icons may work.
Here is a <i class='fa fa-calendar'></i> calendar and a <i class='fa fa-couch'></i> couch.
Here is a calendar and a couch.
4 Code formatting
Code can be defined inline where `this` looks like this. R code can be executed inline `r Sys.Date()` producing 2022-04-13. Code can also be defined inside code blocks.
```
This is code
```
This is codeR code is executed inside code blocks like this
```{r}
Sys.Date()
```
which shows the code and output.
Sys.Date()## [1] "2022-04-13"The code and results can be hidden by ```{r,echo=FALSE,results='hide'}`.
Here is another example of executed R code with input and output.
data(iris)
head(iris[,1:2])
5 Lists
5.1 Bulleted List
Unordered lists are created using asterisks.
- Bullet 1
- Bullet 2
- Sub-bullet 2.1
- Sub-bullet 2.2
- Sub-bullet 2.1
- Bullet 3
Ordered lists are created using numbers.
- Point 1
- Point 2
- Point 3
6 Images
6.1 Using Markdown
Using regular markdown.
The dimensions are based on image and/or fill up the entire available space. You can control the dimension as shown below.
{width=30%}
This image above is now 30% of it’s original width.
6.2 Using HTML
This image below is 30% size.
<img src="assets/cover.jpg" style="width:30%;"/>
This image below is 30% size, has shadow and corners rounded.
<img src="assets/cover.jpg" style="width:30%;" class="fancyimage"/>
6.3 Using R
R chunks in RMarkdown can be used to control image display size using the arguemnt out.width.
This image below is displayed at a size of 300 pixels.
```{r,out.width=300}
knitr::include_graphics('assets/cover.jpg')
```
This image below is displayed at a size of 75 pixels.
```{r,out.width=75}
knitr::include_graphics('assets/cover.jpg')
```
7 Math expressions
Some examples of rendering equations.
$e^{i\pi} + 1 = 0$\(e^{i\pi} + 1 = 0\)
$$\frac{E \times X^2 \prod I}{2+7} = 432$$\[\frac{E \times X^2 \prod I}{2+7} = 432\]
$$\sum_{i=1}^n X_i$$\[\sum_{i=1}^n X_i\]
$$\int_0^{2\pi} \sin x~dx$$\[\int_0^{2\pi} \sin x~dx\]
$\left( \sum_{i=1}^{n}{i} \right)^2 = \left( \frac{n(n-1)}{2}\right)^2 = \frac{n^2(n-1)^2}{4}$\(\left( \sum_{i=1}^{n}{i} \right)^2 = \left( \frac{n(n-1)}{2}\right)^2 = \frac{n^2(n-1)^2}{4}\)
$\begin{eqnarray} X & \sim & \mathrm{N}(0,1)\\ Y & \sim & \chi^2_{n-p}\\ R & \equiv & X/Y \sim t_{n-p} \end{eqnarray}$\(\begin{eqnarray} X & \sim & \mathrm{N}(0,1)\\ Y & \sim & \chi^2_{n-p}\\ R & \equiv & X/Y \sim t_{n-p} \end{eqnarray}\)
$\begin{eqnarray} P(|X-\mu| > k) & = & P(|X-\mu|^2 > k^2)\\ & \leq & \frac{\mathbb{E}\left[|X-\mu|^2\right]}{k^2}\\ & \leq & \frac{\mathrm{Var}[X]}{k^2} \end{eqnarray}$\(\begin{eqnarray} P(|X-\mu| > k) & = & P(|X-\mu|^2 > k^2)\\ & \leq & \frac{\mathbb{E}\left[|X-\mu|^2\right]}{k^2}\\ & \leq & \frac{\mathrm{Var}[X]}{k^2} \end{eqnarray}\)
8 Tables
8.1 Paged
View of the data using paged tables. This is the default output for RMarkdown.
Tab. 1: Table using paged tibble.
iris[1:15,]8.2 kable
The most simple table using kable from R package knitr.
knitr::kable(head(iris), 'html')| Sepal.Length | Sepal.Width | Petal.Length | Petal.Width | Species |
|---|---|---|---|---|
| 5.1 | 3.5 | 1.4 | 0.2 | setosa |
| 4.9 | 3.0 | 1.4 | 0.2 | setosa |
| 4.7 | 3.2 | 1.3 | 0.2 | setosa |
| 4.6 | 3.1 | 1.5 | 0.2 | setosa |
| 5.0 | 3.6 | 1.4 | 0.2 | setosa |
| 5.4 | 3.9 | 1.7 | 0.4 | setosa |
8.3 kableExtra
More advanced table using kableExtra and formattable.
Tab. 2: Table using kableextra.
 iris[c(1:4,51:53,105:108),] %>%
  mutate(Sepal.Length=color_bar("lightsteelblue")(Sepal.Length)) %>%
  mutate(Sepal.Width=color_tile("white","orange")(Sepal.Width)) %>%
  mutate(Species=cell_spec(Species,"html",color="white",bold=T,
    background=c("#8dd3c7","#fb8072","#bebada")[factor(.$Species)])) %>%
  kable("html",escape=F) %>%
  kable_styling(bootstrap_options=c("striped","hover","responsive"),
                full_width=F,position="left") %>%
column_spec(5,width="3cm")| Sepal.Length | Sepal.Width | Petal.Length | Petal.Width | Species | |
|---|---|---|---|---|---|
| 1 | 5.1 | 3.5 | 1.4 | 0.2 | setosa |
| 2 | 4.9 | 3.0 | 1.4 | 0.2 | setosa |
| 3 | 4.7 | 3.2 | 1.3 | 0.2 | setosa |
| 4 | 4.6 | 3.1 | 1.5 | 0.2 | setosa |
| 51 | 7.0 | 3.2 | 4.7 | 1.4 | versicolor |
| 52 | 6.4 | 3.2 | 4.5 | 1.5 | versicolor |
| 53 | 6.9 | 3.1 | 4.9 | 1.5 | versicolor |
| 105 | 6.5 | 3.0 | 5.8 | 2.2 | virginica |
| 106 | 7.6 | 3.0 | 6.6 | 2.1 | virginica |
| 107 | 4.9 | 2.5 | 4.5 | 1.7 | virginica |
| 108 | 7.3 | 2.9 | 6.3 | 1.8 | virginica |
8.4 DT
Interactive table using R package DT.
Tab. 3: Table using datatable.
iris %>%
  slice(1:15) %>%
  datatable(options=list(pageLength=7))
9 Static plots
9.1 Base plot
- Plots using base R are widely used and may be good enough for most situations.
- But they lack a consistent coding framework.
{plot(x=iris$Sepal.Length,y=iris$Sepal.Width,
      col=c("coral","steelblue","forestgreen")[iris$Species],
      xlab="Sepal Length",ylab="Sepal Width",pch=19)
legend(x=7,y=4.47,legend=c("setosa","versicolor","virginica"),
       col=c("coral","steelblue","forestgreen"),pch=19)}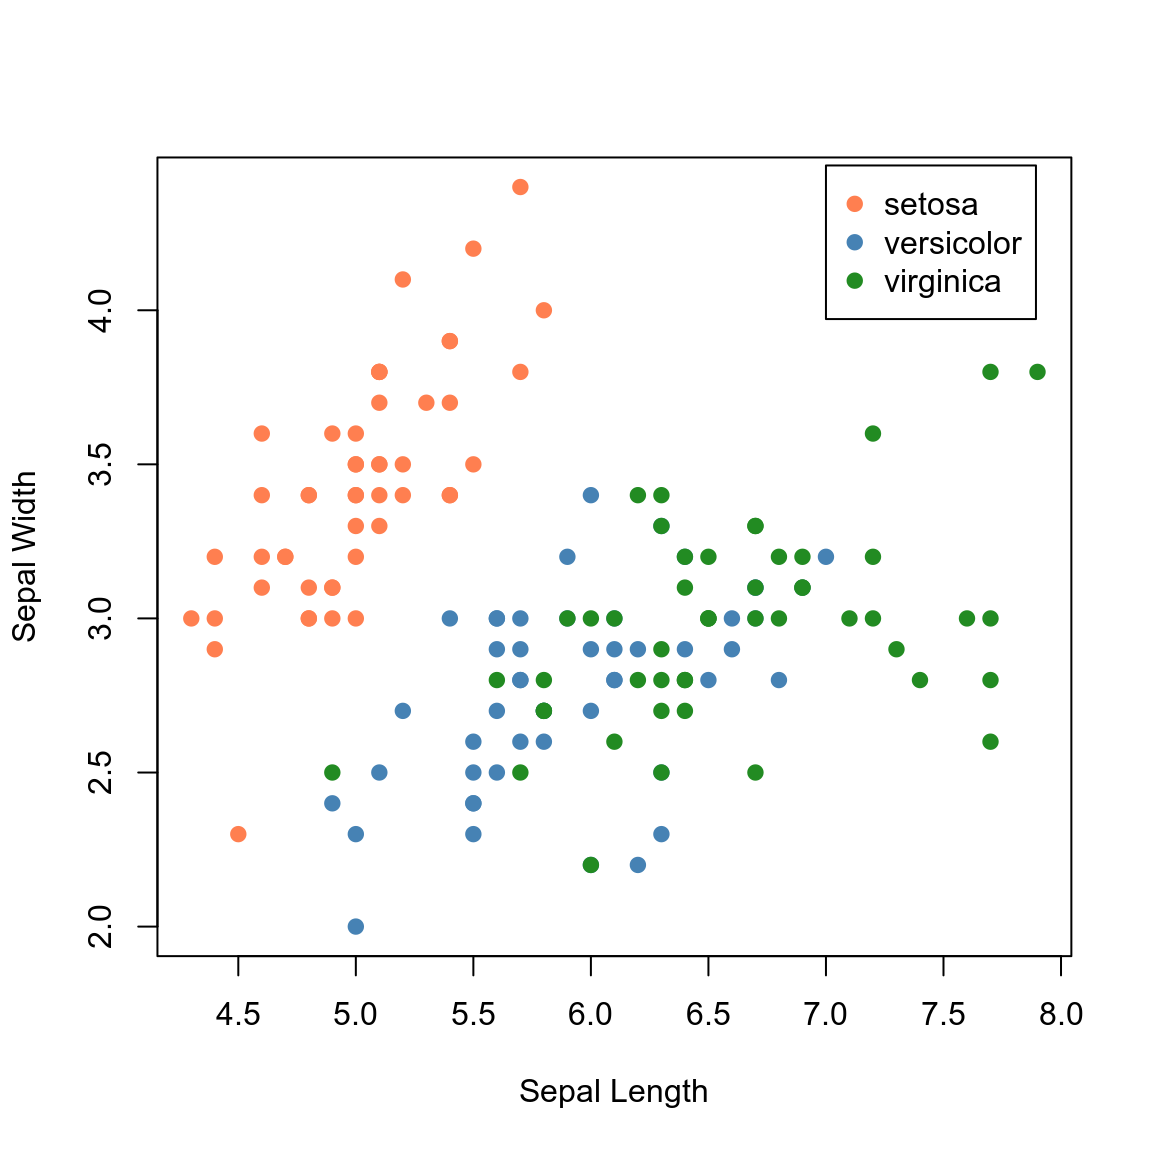
Fig. 1: Static plot using base plot.
9.2 ggplot2
R package ggplot2 is one of the most versatile and complete plotting solutions.
iris %>%
  ggplot(aes(x=Sepal.Length,y=Sepal.Width,col=Species))+
  geom_point(size=2)+
  labs(x="Sepal Length",y="Sepal Width")+
  theme_report()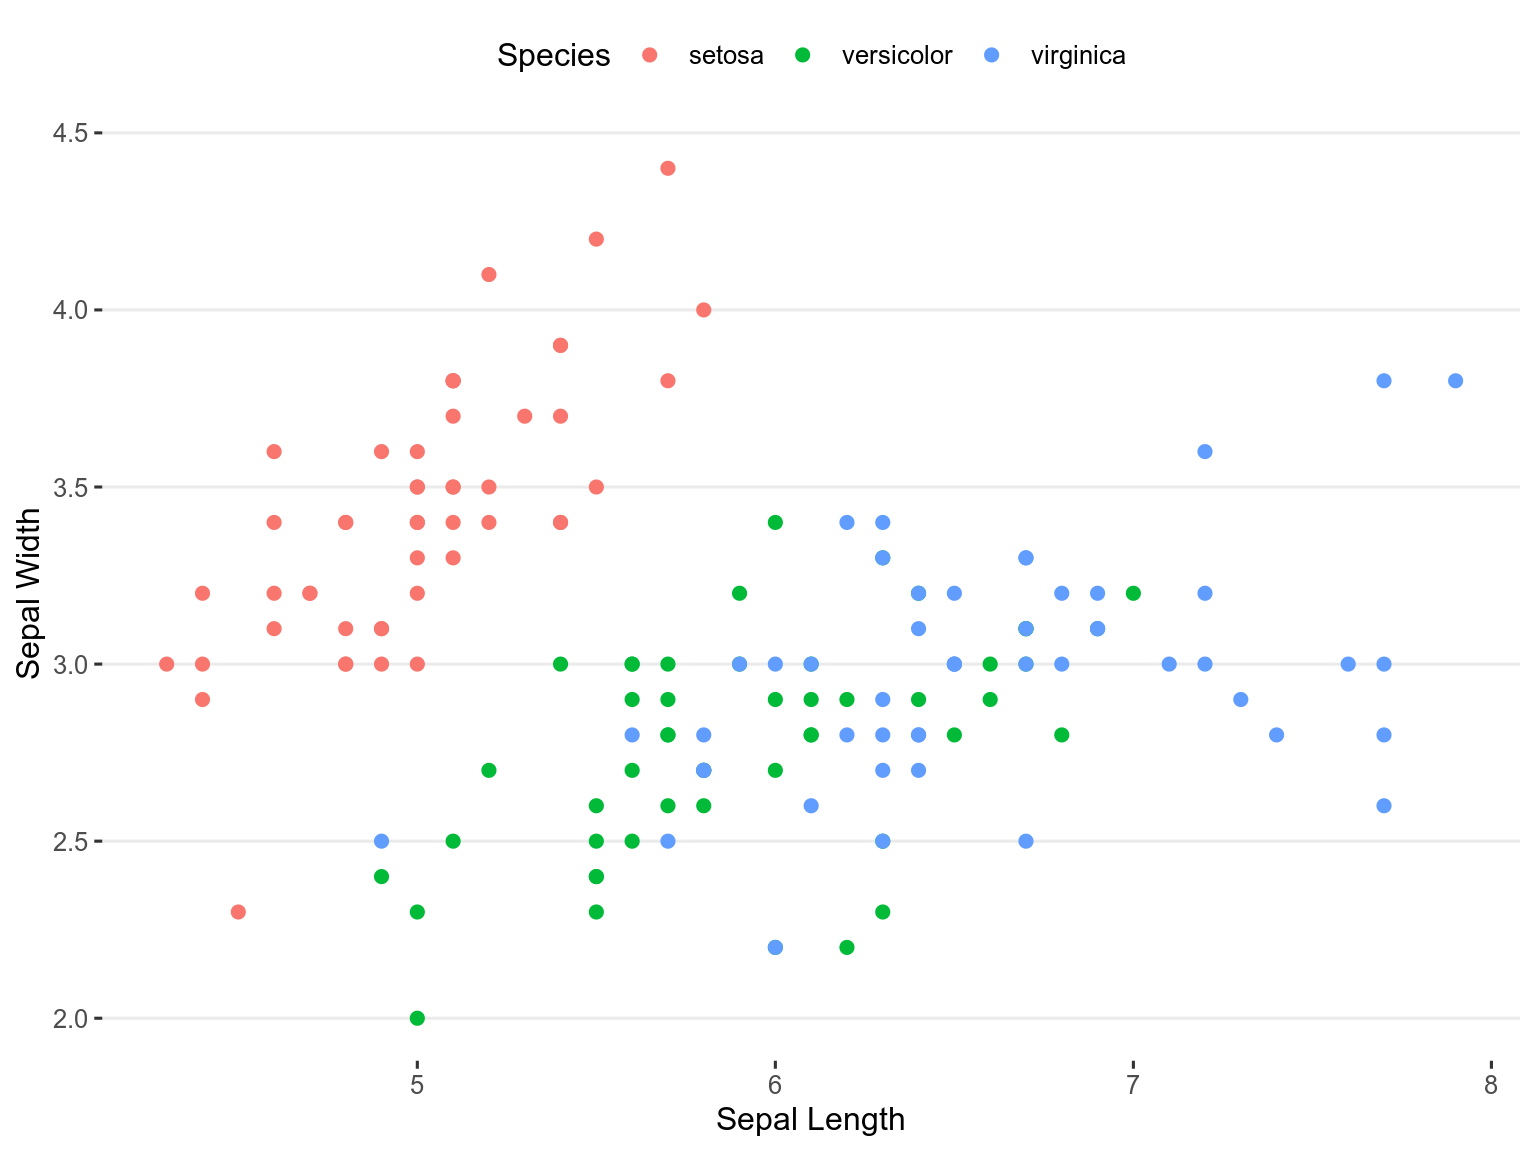
Fig. 2: Static plot using ggplot2.
10 Interactive plots
10.1 highcharter
R package highcharter is a wrapper around javascript library highcharts.
h <- iris %>%
  hchart(.,"scatter",hcaes(x="Sepal.Length",y="Sepal.Width",group="Species")) %>%
  hc_xAxis(title=list(text="Sepal Length"),crosshair=TRUE) %>%
  hc_yAxis(title=list(text="Sepal Width"),crosshair=TRUE) %>%
  hc_chart(zoomType="xy",inverted=FALSE) %>%
  hc_legend(verticalAlign="top",align="right") %>%
  hc_size(height=400)

htmltools::tagList(list(h))
Fig. 3: Interactive scatterplot using highcharter.
10.2 plotly
R package plotly provides R binding around javascript plotting library plotly.
p <- iris %>%
  plot_ly(x=~Sepal.Length,y=~Sepal.Width,color=~Species,width=500,height=400) %>%
  add_markers()
p
Fig. 4: Interactive scatterplot using plotly.
10.3 ggplotly
plotly also has a function called ggplotly which converts a static ggplot2 object into an interactive plot.
p <- iris %>%
  ggplot(aes(x=Sepal.Length,y=Sepal.Width,col=Species))+
  geom_point()+
  labs(x="Sepal Length",y="Sepal Width")+
  theme_bw(base_size=12)

ggplotly(p,width=500,height=400)
Fig. 5: Interactive scatterplot using ggplotly.
10.4 ggiraph
ggiraph is also an R package that can be used to convert a static ggplot2 object into an interactive plot.
p <- ggplot(iris,aes(x=Sepal.Length,y=Petal.Length,colour=Species))+
      geom_point_interactive(aes(tooltip=paste0("<b>Petal Length:</b> ",Petal.Length,"\n<b>Sepal Length: </b>",Sepal.Length,"\n<b>Species: </b>",Species)),size=2)+
  theme_bw()

tooltip_css <- "background-color:#e7eef3;font-family:Roboto;padding:10px;border-style:solid;border-width:2px;border-color:#125687;border-radius:5px;"

ggiraph(code=print(p),hover_css="cursor:pointer;stroke:black;fill-opacity:0.3",zoom_max=5,tooltip_extra_css=tooltip_css,tooltip_opacity=0.9)
Fig. 6: Interactive scatterplot using ggiraph.
10.5 dygraphs
R package dygraphs provides R bindings for javascript library dygraphs for time series data.
lungDeaths <- cbind(ldeaths, mdeaths, fdeaths)
dygraph(lungDeaths,main="Deaths from Lung Disease (UK)") %>%
  dyOptions(colors=c("#66C2A5","#FC8D62","#8DA0CB"))
Fig. 7: Interactive time series plot using dygraph.
10.6 Network graph
R package networkD3 allows the use of interactive network graphs from the D3.js javascript library.
data(MisLinks,MisNodes)
forceNetwork(Links=MisLinks,Nodes=MisNodes,Source="source",
             Target="target",Value="value",NodeID="name",
             Group="group",opacity=0.4)
Fig. 8: Interactive network plot.
10.7 leaflet
R package leaflet provides R bindings for javascript mapping library; leafletjs.
leaflet(height=500,width=700) %>%
  addTiles(urlTemplate='http://{s}.tile.openstreetmap.org/{z}/{x}/{y}.png') %>%
  #addProviderTiles(providers$Esri.NatGeoWorldMap) %>%
  addMarkers(lat=57.639327,lng=18.288534,popup="RaukR") %>%
  setView(lat=57.639327,lng=18.288534,zoom=15)
Fig. 9: Interactive map using leaflet.
10.8 crosstalk
R package crosstalk allows crosstalk enabled plotting libraries to be linked. Through the shared ‘key’ variable, data points can be manipulated simultaneously on two independent plots.
shared_quakes <- SharedData$new(quakes[sample(nrow(quakes), 100),])
lf <- leaflet(shared_quakes,height=300) %>%
        addTiles(urlTemplate='http://{s}.tile.openstreetmap.org/{z}/{x}/{y}.png') %>%
        addMarkers()
py <- plot_ly(shared_quakes,x=~depth,y=~mag,size=~stations,height=300) %>%
        add_markers()

htmltools::div(lf,py)
Fig. 10: Linking independent plots using crosstalk.
11 Advanced
These are features implemented in this workshop material.
11.1 Icons
Icons can be placed directly into md or Rmd using HTML i-tag.
<i class="fas fa-lightbulb"></i>
<i class="fas fa-exclamation"></i>
<i class="fas fa-clipboard-list"></i>
<i class="fas fa-comments"></i>
<i class="fas fa-desktop"></i>
<i class="fas fa-cloud"></i>
<i class="fas fa-check"></i>
<i class="fas fa-times"></i>
<i class="fas fa-skull"></i>
Icons can also be placed programatically through R using the R package fontawesome.
`r fontawesome::fa('lightbulb')`
Optional arguments are height and fill.
`r fontawesome::fa('lightbulb',height='30px',fill='steelblue')`
For full list of icons check out FontAwesome.
11.2 Abstract
Highlighted instruction boxes can be created using a div with class abstract.
<div class="abstract">
This is some instruction.
</div>
This is some instruction.
11.3 Alerts
<div class="alert alert-success" role="alert">
  This is a success alert—check it out!
</div>
<div class="alert alert-danger" role="alert">
  This is a danger alert—check it out!
</div>
<div class="alert alert-warning" role="alert">
  This is a warning alert—check it out!
</div>
<div class="alert alert-info" role="alert">
  This is a info alert—check it out!
</div>
Note: This is a success alert!
Note: This is a danger alert!
Note: This is a warning alert!
Note: This is a info alert!
11.4 Block title
The code language can be displayed above input code by setting block.title=TRUE.
It can be placed above source block with output.
```{r,block.title=TRUE}
Sys.Date()
``` Sys.Date()## [1] "2022-04-13"Or it can be placed above source block without output.
```{r,block.title=TRUE,eval=FALSE}
Sys.Date()
``` Sys.Date()Or above output block if the source is hidden. In this case, the title changes to OUTPUT.
```{r,block.title=TRUE,echo=FALSE}
Sys.Date()
``` ## [1] "2022-04-13"For instruction, it might be necessary to run some code and print the output as input-source-code. echo=FALSE hides the source code. comment="" hides the ## from print statements. class.output="r" code highlights the output block.
```{r,block.title=TRUE,echo=FALSE,comment='',class.output='r'}
cat('Sys.Date()')
``` Sys.Date()11.5 Accordion
```{r,accordion=TRUE}
Sys.Date()
```
Sys.Date()## [1] "2022-04-13"11.6 Blur panel
```{r,blur=TRUE}
Sys.Date()
``` Sys.Date()## [1] "2022-04-13"12 General tips
- Add custom css under YAML
css: ["default", "my-theme.css"]
- Check out Rstudio’s RMarkdown tutorial
- Input code from code chunks are displayed by default. Use
echo=FALSEin code chunks to hide input code.
13 Session info
## R version 4.1.0 (2021-05-18)
## Platform: x86_64-conda-linux-gnu (64-bit)
## Running under: Ubuntu 20.04.4 LTS
##
## Matrix products: default
## BLAS/LAPACK: /home/roy/miniconda3/envs/r-4.1/lib/libopenblasp-r0.3.15.so
##
## locale:
##  [1] LC_CTYPE=en_GB.UTF-8       LC_NUMERIC=C
##  [3] LC_TIME=en_GB.UTF-8        LC_COLLATE=en_GB.UTF-8
##  [5] LC_MONETARY=en_GB.UTF-8    LC_MESSAGES=en_GB.UTF-8
##  [7] LC_PAPER=en_GB.UTF-8       LC_NAME=C
##  [9] LC_ADDRESS=C               LC_TELEPHONE=C
## [11] LC_MEASUREMENT=en_GB.UTF-8 LC_IDENTIFICATION=C
##
## attached base packages:
## [1] stats     graphics  grDevices utils     datasets  methods   base
##
## other attached packages:
##  [1] crosstalk_1.2.0.9000 leaflet_2.1.1        networkD3_0.4
##  [4] dygraphs_1.1.1.6     ggiraph_0.8.2        plotly_4.10.0
##  [7] highcharter_0.9.4    ggplot2_3.3.5        DT_0.22
## [10] formattable_0.2.1    kableExtra_1.3.4     stringr_1.4.0
## [13] tidyr_1.2.0          dplyr_1.0.8          fontawesome_0.2.2
## [16] captioner_2.2.3      bookdown_0.25        knitr_1.38
##
## loaded via a namespace (and not attached):
##  [1] httr_1.4.2         sass_0.4.1         jsonlite_1.8.0     viridisLite_0.4.0
##  [5] bslib_0.3.1        shiny_1.7.1        assertthat_0.2.1   TTR_0.24.3
##  [9] highr_0.9          yaml_2.3.5         pillar_1.7.0       backports_1.4.1
## [13] lattice_0.20-45    glue_1.6.2         rlist_0.4.6.2      uuid_1.0-4
## [17] digest_0.6.29      promises_1.2.0.1   RColorBrewer_1.1-3 rvest_1.0.2
## [21] colorspace_2.0-3   httpuv_1.6.5       htmltools_0.5.2    pkgconfig_2.0.3
## [25] broom_0.7.12       xtable_1.8-4       purrr_0.3.4        scales_1.1.1
## [29] webshot_0.5.2      svglite_2.1.0      later_1.3.0        tibble_3.1.6
## [33] generics_0.1.2     farver_2.1.0       ellipsis_0.3.2     withr_2.5.0
## [37] lazyeval_0.2.2     cli_3.2.0          quantmod_0.4.18    mime_0.12
## [41] magrittr_2.0.3     crayon_1.5.1       evaluate_0.15      fansi_1.0.3
## [45] xts_0.12.1         xml2_1.3.3         tools_4.1.0        data.table_1.14.2
## [49] lifecycle_1.0.1    munsell_0.5.0      compiler_4.1.0     jquerylib_0.1.4
## [53] systemfonts_1.0.4  rlang_1.0.2        grid_4.1.0         rstudioapi_0.13
## [57] htmlwidgets_1.5.4  igraph_1.3.0       labeling_0.4.2     rmarkdown_2.13
## [61] gtable_0.3.0       DBI_1.1.2          curl_4.3.2         R6_2.5.1
## [65] zoo_1.8-9          lubridate_1.8.0    fastmap_1.1.0      utf8_1.2.2
## [69] stringi_1.7.6      Rcpp_1.0.8.3       vctrs_0.4.0        tidyselect_1.1.2
## [73] xfun_0.30
Built on: 13-Apr-2022 at 20:30:48.
2022 • SciLifeLab • NBIS • RaukR


That reference refers to this footnote.↩︎